1
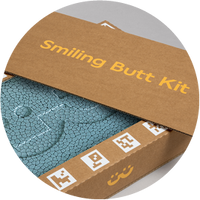
Congratulations, your Smiling Butt Kit has arrived. You now have everything you need to configure your own customized saddle. There are really only a few steps left and we'll start printing. What will it be?
Getting familiar with the Smiling Butt Kit
Before you start, we must point out that the foam in the Smiling Butt Kit is very delicate and you really only have one shot to imprint your buttocks. Handle it very carefully. But don't worry, it's not rocket science. Plus, we've prepared an instructional video to guide you through the process. Please view it beforehand.
Easy, right? Let's recap.
Before you settle into the foam, you'll need:
• Smiling Butt Kit
• High-resolution camera phone (set it to the highest resolution and photo quality)
• Tight-fitting underwear (boxers, briefs, underpants - in short, anything that clings tightly to the body)
• A flat stool or chair (just high enough so that the legs and body are at right angles when sitting on the foam)
Prepare the kit
Rotate the Smiling Butt Kit so the instructions are facing you. Open the kit from the right side, push the inner tray with foam from the left side and slide it out. Set the tray with foam aside in a safe place for now. Turn the empty Smiling Butt Kit packaging face toward you and peel out the cardboard plate. Now you'll practice how to sit properly.
Butt imprint try-out (on cardboard)
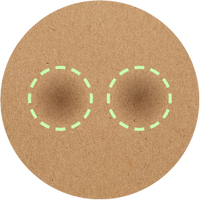
You only get one shot at making your butt imprint. Don't sweat. You got this! To make sure everything sits correctly, you'll try to identify your sit bones first. Place the cardboard plate on the stool and slowly sit down. Wiggle slightly from side to side and front to back. Can you feel your sit bones? If so, hold on to the sides of the stool, straighten your back, lift your toes and pull yourself towards the stool. A training imprint of your sit bones has just been made! Lift yourself off the stool. There should be two small indents on the cardboard plate where your sit bones are. Now that you have practiced let's go to the real deal!
You may think, "But that's not how I sit on my bike!" You're right. We have chosen this type of position to be able to get the best possible impression of your buttocks, including the width of your sit bones. This is one of the most valuable pieces of data we need for our algorithm.
Creating an actual imprint of your butt
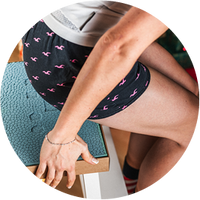
Let's begin the real fun. Are you wearing tight-fitting underwear? Leave the loose-fitting boxer shorts and padded cycling shorts in the closet. Put the foam in the cardboard tray on the stool. Grab and hold the sides of the stool. Slowly, with your back straight, sit in the middle of the foam. Remember where your sit bones were and aim for that spot. Lift your heels slightly - this will help you press into the foam even more and make the print prominent and beautiful. Use your hands to pull yourself into the foam, keeping your back straight. That's it! Carefully lift yourself up and admire your Smiling Butt Imprint. The impression may be shallow or deep, and it is possible that one half will be imprinted more prominently than the other. Don't worry. Our experts will handle it, and it is OK.
Only sit on the foam once! Whatever the print looks like, don't try to fix it at any cost.

Taking photos
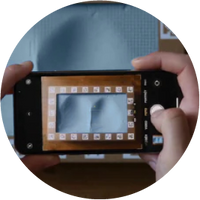
Carefully slide the butt imprint back into the Smiling Butt Kit box with the imprint facing up. Close the box and place it on a table you can access from all sides. Now snap a photo of the box with the imprint from the top view and from 8 positions (as indicated in the photo). Stand next to the table and place your hands with the phone slightly above waist level. From there, you can start taking pictures.
Important notes:
• Take the set od 9 photos in a room with good natural lighting – do not use a spotlight or flash.
• Don't turn the Smiling Butt Kit during the photo shoot – walk around the kit with the camera.
• Make sure all the white guiding marks from the edge of the box are in each photo. We cannot process the photo without them.
• Don't crop the pictures or manipulate with them in any way
• Use one of the supported formats: .jpg, .jpeg, .png, .heic.
Uploading photos and saddle configuration
And now back to online. Check that the photos are in good focus and that you can see all the white guide marks on each one. Everything okay? Great, now upload the photos to the website configurator and configure your saddle using the short questionnaire. The whole process takes about 10 minutes.
We'll ask a few questions about your bike, your riding style, and your cycling personality. We'll finish it all off with the icing on the cake of saddle personalisation. Once you've completed the questionnaire, you're done and it's our turn. First, we'll check that all your data arrived in order and let you know. And then we fire up the printer. In 6-8 weeks, you'll have Joyseat at home.
What to do with your kit?
For the time being, do not discard the Smiling Butt Kit or damage it in any way. Our experts need to check your photos from the configurator. If any of them are unusable, we will contact you and ask you to take new photos. Once everything has been successfully uploaded and you receive confirmation from us that everything is in order, you can hang your imprint on the wall and exhibit it at home as a little work of art. You'll even find a hole on the back of the box for a hook.
You're another step closer to your customized Joyseat saddle. Once we're ready to expedite the shipment, you will receive a tracking code from us. In about 6 to 8 weeks, your unique Joyseat saddle will arrive carefully packaged at your doorstep.

